•Adding an Image or a Logo to an Item
•Inserting an Image in an Article or Message
There are two ways that you can add an image from the internet depending on where you are in the Desktop:
•Using the  button next to image/logo fields
•Using the  button when creating an article or a message.
Adding an Image or a Logo to an Item
Images/logos can be added to almost any configurable item (venues, events, delivery methods, stored value items).
To add an image from the internet enter the absolute URL (including http: or https:) in the image/logo field.
Inserting an Image in an Article or Message
To insert an image from the Internet into an article or message:
1.Place the cursor where you would like to insert the image.
2.Click .
The Image Properties light box appears.
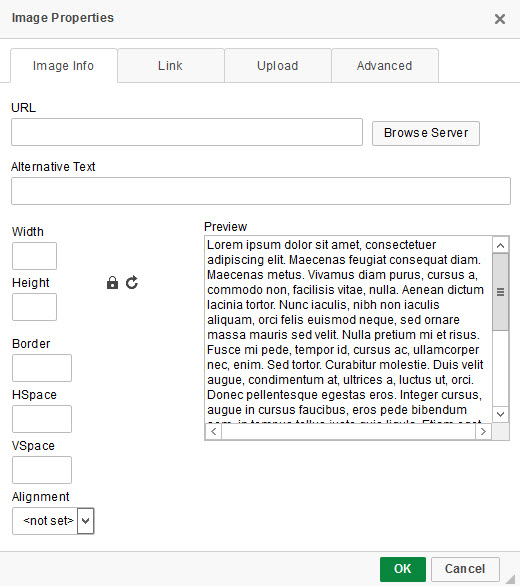
3.Enter the absolute URL for the image in the 'URL' field (http://suttonstreettheatre.com/images/image1.jpg).
The image appears in the 'Preview' field.
4.Ensure you enter descriptive alt text for the image in the 'Alternative Text' field.
Alt image text is used to briefly describe what the image depicts if users cannot view an image (the image does not display or if the user utilizes a screen reader). It is often an accessibility requirement.
5.To adjust the dimensions of the image:
a.To ensure that the pixel dimension ratios of the image remain the same, click  to lock the ratios.
If you see  , the ratios are already locked.
b.To adjust the pixel dimensions to your own ratio, click to unlock the ratios
If you see , the ratios are already unlocked.
c.To reset the pixel dimension ratios to those of the original image, click  .
.
d.Adjust the height and width pixel values in the 'Height' and 'Width' fields.
The image size is updated in the 'Preview' field.
6.To adjust the appearance and alignment of the image:
a.Border: Enter the size of the border. If you do not want a border around the image, leave the field blank.
b.HSpace: Enter the horizontal spacing value
c.VSpace: Enter the vertical spacing value.
d.Align: Select the alignment for any surrounding text.
As you adjust the image, the 'Preview' field is updated.
7.Click 'OK'.
The image is inserted.
8.Click 'Apply'.
A window confirms that the message/article was updated.
9.Click 'OK'.