•Introduction to the Virtual Waiting Room
•Technical Introduction to the Virtual Waiting Room
•Configuring the Virtual Waiting Room
•tsApp.setMaxActiveSessions(max_active_sessions)
Introduction to the Virtual Waiting Room
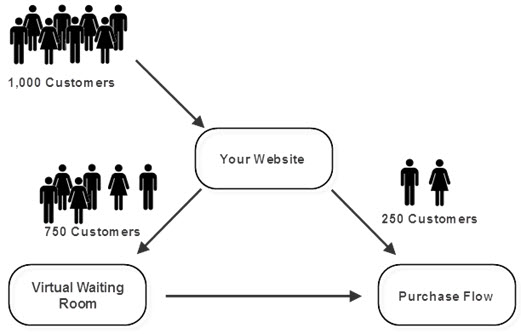
The virtual waiting room is used to prevent significant traffic-driving on-sales from crashing servers. When a large volume of customers access a website at the same time they consume all of the available memory and CPU usage, and are unable to purchase tickets and merchandise.
The virtual waiting room acts like a doorman to your online store, monitoring the number of customers allowed inside at any given time. Once the number of customers within your store (active customer sessions) reaches the preconfigured limit, any additional customers (new sessions) are placed into the virtual waiting room queue

Waiting customers are informed that the server is currently experiencing a large number of requests, that they have been placed into a priority order and that they will be automatically redirected as soon as possible.

As customers complete their transactions and exit your online store, the number of current, active sessions falls below the maximum, and the next customer in line is admitted.
The following pages will trigger the Virtual Waiting Room when the active session limit is reached:
The article that is displayed to users who are entering the virtual waiting room is referenced, by its GUID, in the Registry - Registry::EN::Application::Online::Links node's 'Virtual Waiting Room' field.
Technical Introduction to the Virtual Waiting Room
The maximum number of visitors that can be served by a single instance of the server is mainly restricted by two factors - available memory and CPU usage.
Each active session consumes memory regardless of whether the visitor is active or not at any given moment. In addition to this, visitors also use CPU resources when they submit requests, such as selecting seats or viewing their accounts.
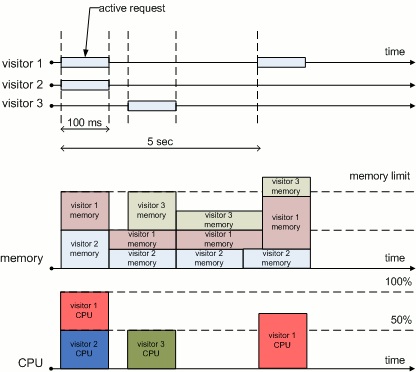
Consider the following diagram, which shows three visitors of the application website. When visitor 1 and visitor 2 make first requests, they consume memory to maintain their sessions and process both requests. In addition to this, both visitors will use the CPU while their requests are being actively processed.

After each of the requests is processed within 100ms, CPU usage falls to zero, but memory does not return to the same mark until these two sessions expire. The process repeats when visitors submit new requests or new visitors arrive. If the number of active visitors is not controlled by the application in some way, the amount of memory required to maintain everyone's sessions may approach the physical per-application memory limit imposed by the operating system and further requests will fail due to lack of memory, as shown on the diagram above.
The Virtual Waiting Room
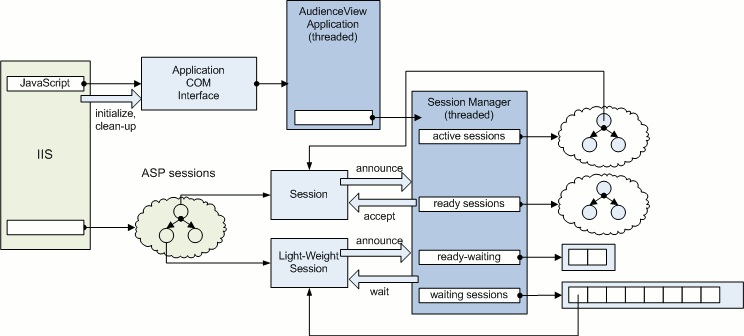
The purpose of the Virtual Waiting Room is to control the maximum number of active sessions served by each server. This is achieved by creating a light-weight, restricted session for each new visitor and promoting such a session to an active session when the number of current active sessions falls below the allowed limit. The diagram below shows the components participating in session management.

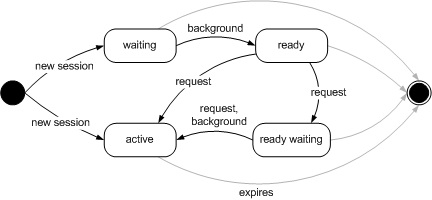
Each new session announces itself to Session Manager, which checks if the number of active sessions is under the configurable maximum, and if it is, indicates to the session that it can continue as an active session. Otherwise, the session is placed in the waiting room queue, which is monitored by Session Manager's background thread. Once the number of active sessions falls below the allowed maximum, Session Manager moves the next waiting session into the ready state, and, upon receiving the next request from this session, into the active state. These state transitions are shown on the diagram below.

The ready-waiting state, which is disabled by default, is a special state that is intended to account for one-hit sessions. That is, if a visitor came to the website by mistake, IIS will still create a new ASP session, which in turn creates a new light-weight session. Eventually, this session will be moved into the ready state and will occupy a slot in the active session pool until the session expires, delaying activation of a non-idle waiting session. When the ready-waiting state is enabled, Session Manager will move more waiting sessions into the ready state than there are empty slots in the active session pool. Non-idle sessions will then be activated upon receiving the next request, while idling sessions will remain in the ready state until they expire. In the event that all ready sessions show activity, sessions will be activated in the order of received requests. For example, if there are two empty slots and three sessions have been moved into the ready state, two sessions will be activated as described above, while the third one will be placed into the ready-waiting state and will be activated as soon as a slot is available in the active session pool. Sessions in the ready-waiting state have higher priority and will be processed before those in the ready state and, similarly, sessions in the ready state are processed before sessions in the waiting state.
Configuring the Virtual Waiting Room
Each instance of the Virtual Waiting Room is configured individually through public methods of the application object.
tsApp.setMaxActiveSessions(max_active_sessions)
The tsApp.setMaxActiveSessions method changes the current number of maximum sessions to the specified value. The maximum number of sessions is not restricted by default, which, effectively, disables the Virtual Waiting Room. This method may be called at any time, even after the system has been initialized. The following example shows how to configure the Session Manager to maintain, at most, 250 active sessions:
function Application_OnStart() {
var tsApp = Application.StaticObjects("tsApp");
...
// specify the maximum number of active sessions
tsApp.setMaxActiveSessions(250);
SUMO.verifySessionState()
The SUMO.verifySessionState() method verifies if the calling session is active, in which case the return value is true, or not, in which case it is false. This method also allows request-based state transitions, such as (ready, active) and is expected to be called periodically.
Virtual Waiting Room Logging
The Session Manager logs session-related activity at the debug level (Level 4), which is not enabled by default. The log level may be changed in default.json, as shown in the example below:
function Application_OnStart() {
var tsApp = Application.StaticObjects("tsApp");
// change log level to debug
tsApp.setLogLevel(4);
|
Information The debug level may generate more output than the default informational level and make sure there is sufficient room on the drive configured for logging. |
